There are many benefits of adding images in your blog posts. First of all, blogs with images allow readers to read the post easily because photos break up lengthy and long paragraphs of content into small and engaging chunks. Through this, you can keep your visitors connected with your website. Secondly, well-labeled images allow visitors to find your articles and blog.
But, many of the new WordPress users find difficulties in uploading and inserting images in the blog post. Those people who are adapted to using social sites like Facebook, Twitter and Instagram know that uploading an image is a simple process. Here, uploaded files or images are automatically cropped to fit the site’s default image size.
Unluckily, WordPress doesn’t make it so simple, as it provides you complete control over putting images in the blog posts. That’s why; many beginners find it confusing while inserting photos in the blogs or articles. And, the result is often misaligned images, or the photos drain into the sidebars.
But now, you don’t need to worry because there are two simple ways that can help you upload and place your images in your post and page. The two methods are:
- Install a Plugin
- Add 8 simple lines of code
In this blog post, we will focus how to create perfect blog images with auto scale and crop for WordPress sites.
If you are not comfortable with adding lines of code to your theme files, then you can also use the WordPress Image Plugin that is used to insert additional image sizes for you automatically.
On the other side, you can also add 8 lines of code (if you are comfortable) to get perfect blog images.
Well, there are two options to the image uploader and embedder, the one which scales the image to a perfect blog box fit, and the another crops the image to a consistent size all around your WordPress installation.
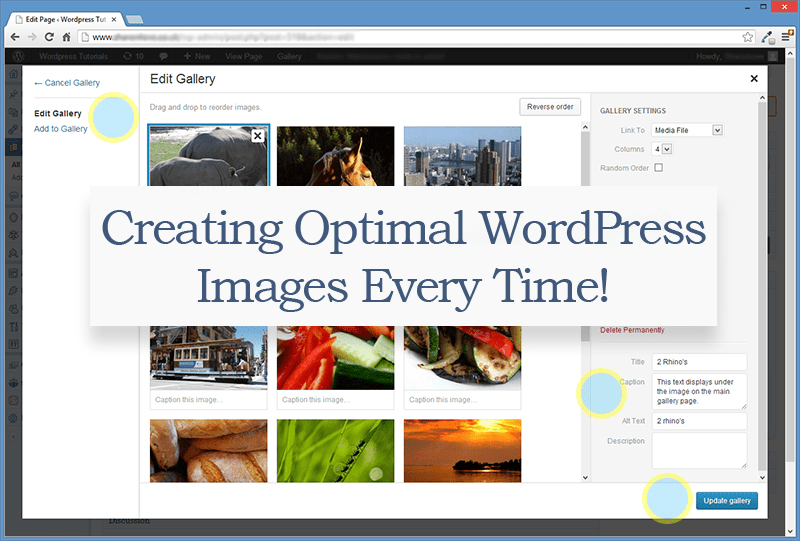
You can see options in the blue box that are standard WordPress post thumbnail options. A 140-pixel square thumbnail, and the 200-pixel square medium image, the large size width of 1000 pixels, and the full-size, defaults to the image size that is being uploaded into the post. It is a powerful offering of image sizes, but it is not necessary that it will match your blog’s requirement or its design.
If your image doesn’t fit your blog’s width, then you will need to use the Image Editor inside WordPress to force the picture to fit in the blog box. This procedure confuses many users because WordPress’ image editing screen is not user-friendly.
However, there are several resources that will help you accomplish this process more quickly and smoothly.

Browser Debugger/Inspector – Each browser has an inbuilt debugger or an extension. Chrome has Inspector, Firefox has Firebug and Internet Explorer has Developer Tools. These elements allow you to see website markup directly in your browser.
Code Editor – If you want to do any theme editing, then you will need an excellent code editor. You can find both the free and premium code editor on the market. You can use Coda for Mac, which is a premium editor, but there are few other free resources such as Notepad ++, Netbeans, and TextWrangler.

FTP Program – You will need to use code editor with an objective to upload and download files to your server. Most of them are free of costs such as Cyberduck for Mac or FileZilla that runs smoothly on Mac and PC. If you want to use a premium one, then you need to include FTP program.
Why Determining the Content Column Width is Necessary?
It is important to have a complete understanding of your content column widths while uploading and inserting images into your posts. Commonly, this setting will be the most restricting factor for your post images because any photo with a size that outstrips the post box width will spread out of the post box and overlay on your sidebar content.
Well, there are some simple ways that can help you find your column widths.
- Theme options – One of the simplest ways is to check in your theme options. Many themes will have theme options as a basic setting. You only need to navigate to that area and note the width of a post box.
- Theme Editor – You can also code inside your theme files by using the code editor or inbuilt WordPress theme editor that can help you find CSS selectors for post_box, sidebar, and content_box. On the same note, I am not recommending you to use this method because any devious change in the theme file could cause irregularity in your theme or can break up your theme.
- Inspector – This is the easiest way to find out your content column width. Use your browser debugger to see the code of your website. In fact, Firebug works well in a similar manner as does Internet Explorer’s developer tools.
Create the Custom Image Size Code
Once understanding the width of your content column box, you can decide what kind of standard image you want to add on your website. You can use the images that spread the entire post box width that is space from left text margin to the right text margin. Through this, an image will be correctly aligned with the readable text.
The information about website’s content columns allows you to make the custom image size code and insert it in your theme files. Particularly, you will have to edit the functions.php file that can be found in your theme directory. The theme directory will look like this:
http://example.com/wpcontent/themes/yourthemenamehere/functions.php.
In case, you use a custom WordPress framework such as Thesis or Genesis, then you will need to use a separate file like custom_functions file. And, this code will add in that file.
But, first you need to confirm that whether your theme is using the native WordPress image functionality or not. To do that, you can cross-check in your post editor.
How to Add WordPress Post Thumbnail Support?
First, go to the Post Section of your WordPress admin area. Then, create a new post or you can also edit an existing one. If you see an area known as “Featured Image” you are all set.
Note: You may need to develop your screen viewing options to see this section.
If you are unable to see the featured image area, then it would be possible that your post thumbnail support has not been added to your theme. It is a simple procedure with the following code- included to your functions.php file.
add_theme_support( 'post-thumbnails' );
This includes functionality such as a representative image for Pages, Posts or any Custom Post Types. However, how the image display will be up to the individual theme.
To oppose that, we are going to develop a custom image file that is fine-tuned to our theme, and this is where the post box width research needed. Here, we will utilize some code to make a new post image size by including the following code to your functions.php file:
add_image_size( 'full-width', WIDTH, HEIGHT);
Don’t place a code exactly as you are viewing it here, you will need to replace the capital letters according to your needs. To an addition, width should be set as the post box width and add height according to your page’s height. The crop can be either true or false. WordPress usually, defaults to false, so if you don’t want to solid crop your image to the size, you can leave this selector off.
If you want to crop an image to the exact size mentioned with the width and height tags, then you have to enter “true” for crop mode.
Custom Image Re-scaling
add_image_size( 'full-width-ratio', 500, 9999 );
It inserts an image size known as “full-width ratio” with a width of 500 pixels and an unlimited height. Well, it is not set to crop, (default is false – consider nothing comes after height value of 9999) that means WordPress has the potential to resize the image exactly to its original aspect ratio.
Here, we know that our post box has a width of 500 pixels that is why we used the number in the first place. Therefore, the full-width ratio size will put an image into the post that takes up the full width of the post box.
Custom Image Cropping
In case you want a particular image size within your posts and pages, then you will need to use the crop functionality that is executed like this:
add_image_size( 'full-width-crop', 500, 200, true );
This code fixes the image width to 500 pixels wide and 200 pixels high and then crops larger images to that specification after an initial aspect ratio re-scale.
Outcomes of Scaling or Cropping Images in WordPress
Well, there are several benefits and limitations of these methods. While using a hard crop with your images, it will help provide your site a more consistent looks because the image will always remain in the same size. But you may lose some portion of your image to the crop relying on the aspect ratio of the original image. And, when using original images with dimensions that are nearby to your WordPress image size settings, then there will be required few cropping.
Create the Custom Image Size in a Custom Function
Now, the next method is to add the following lines of code to the functions.php file:
function custom_in_post_images( $args ) { $custom_images = array(‘full-width-ratio’ => ‘Full Width Ratio’, ‘full-width-crop’ => ‘Full Width Crop’); return array_merge( $args, $custom_images ); } add_filter( ‘image_size_names_choose’, ‘custom_in_post_images’ );
The first line of code opens a custom function. It is a standard php code. It also carries forward a variable called $args (short for arguments).The second line develops another variable called $ custom_images and make it equal to an arry that adds the two custom image sizes you created, the full width crop and full width ratio. The term written inside the comma in each section is the actual name of an image. The next line of code combines the variable that you created into your $args variable, and the last line of code utilizes a standard WordPress filter to add function to an image that we can see in the post editor. Then, save your functions.php file and upload it to the directory by using your FTP program and go to a new post. While uploading an image, you can see choices of sizes to add into your blog. You will see the two sizes that you added along with dimensions for each one.
Conclusion
Now, you can add more custom image sizes into your blog post. In this blog, we tried to explain you how to get perfect blog images with the help of Auto Scale and crop for WordPress.
Author Bio: Tracy Jones works full time as a WordPress Developer at WPGeeks Ltd. and handles a team of experienced developer who are experts of PSD to WordPress theme conversion. She loves Thai food and her favorite sport is soccer. You can follow her company on various social networks like Facebook and Google+.